Tile installation in Philadelphia requires careful consideration of various factors to guarantee a successful outcome. Proper subfloor preparation is essential, as is selecting the right adhesive based on the tile type. Additionally, accurate measurements and layout planning contribute greatly to the comprehensive aesthetic. Understanding these key elements can help both DIY enthusiasts and professionals alike achieve a durable and visually appealing finish. Nevertheless, there are common pitfalls to avoid that can impact the installation process.
Understanding Different Types of Tiles
When commencing a tile installation project, understanding the various types of tiles available is essential for making informed decisions.
Ceramic tiles are versatile and durable, while porcelain tiles offer superior water resistance. Glass tiles add a touch of elegance, reflecting light beautifully. Natural stone provides a unique, organic feel, and mosaic tiles create intricate designs with diverse colors and textures.
Vinyl tiles are a cost-effective option, mimicking the appearance of natural materials. Considerations such as tile sizes, textures, colors, and patterns greatly influence the aesthetic and functionality of a space, ensuring the final selection aligns with the project’s vision. Additionally, different types of tiles, such as natural stone tiles, vary in hardness and porosity, which can impact their suitability for various applications.
Choosing the Right Adhesive
Selecting the appropriate adhesive is essential for a successful tile installation. Various types of adhesives are available, each suited for specific tile materials and environments. Understanding application techniques further enhances the effectiveness of the chosen adhesive, ensuring lasting results. Additionally, knowledge of proper installation techniques is crucial for achieving the best adhesion in wet areas and high-traffic zones.
Types of Adhesives
Choosing the right adhesive is essential for ensuring a durable and lasting tile installation.
Thinset mortar is commonly used for its strong bonding capabilities and is ideal for most tile types.
Mastic adhesive offers ease of application and is suitable for dry areas, while epoxy adhesive provides exceptional durability and moisture resistance, making it ideal for wet environments.
Pressure sensitive adhesive is often utilized for vinyl tiles, allowing for easier repositioning.
Modified thinset, enhanced with polymers, improves adhesion and flexibility, making it a versatile choice for various surfaces.
Selecting the appropriate adhesive contributes greatly to the success of the tile installation process.
Application Techniques
Applying the right adhesive requires careful consideration of the specific tile type and installation environment. Different tile materials, such as ceramic, porcelain, or natural stone, necessitate distinct adhesives to guarantee ideal adhesion and longevity.
In addition, the chosen adhesive should align with the desired tile patterns and installation techniques, as some patterns may require more flexibility or moisture resistance. For instance, a thin-set mortar is suitable for most floor tiles, while a modified thin-set may be needed for challenging environments. Understanding these factors will enhance the durability and appearance of the finished installation, ultimately leading to a successful tiling project. Additionally, utilizing industry-leading tile installation standards can provide valuable guidance on adhesive selection and application techniques.
Preparing the Subfloor
Before laying tiles, it is vital to confirm that the subfloor is properly prepared, as this foundational step greatly affects the longevity and appearance of the finished installation.
A thorough subfloor inspection should be conducted to identify any imperfections, such as cracks or uneven surfaces.
Additionally, moisture testing is essential to make sure that the subfloor remains dry, as excess moisture can lead to mold growth and tile damage.
Addressing these issues by leveling the surface and applying moisture barriers will create a stable foundation, ultimately contributing to a successful tile installation that withstands the test of time.
Measuring and Planning the Layout
Once the subfloor is prepared, measuring and planning the tile layout becomes a critical next step in the installation process.
Proper tile layout guarantees effective space utilization and minimizes waste. To achieve an ideal design, consider the following:
- Measure the dimensions of the room accurately.
- Determine the center point for symmetry.
- Plan for grout lines to enhance aesthetics.
- Visualize the layout using chalk lines or a digital tool.
- Account for any obstructions like cabinets or fixtures.
Additionally, leveraging the expertise of professionals with over 50 years of combined industry experience can ensure a flawless installation and optimal results.
Cutting Tiles Accurately
Cutting tiles accurately is essential for achieving a professional finish in any tiling project.
This process involves using the right tools and employing precise measuring techniques to guarantee clean, even cuts.
Additionally, gaining experience through practice can greatly enhance one’s cutting skills, leading to better overall results.
Tools for Accurate Cutting
When tackling tile installation, having the right tools for accurate cutting is essential to achieve a professional finish.
Selecting appropriate tile cutting tools can greatly impact the quality of the job. Here are key tools that enhance accurate measuring and cutting:
- Tile cutter for straight cuts
- Wet saw for intricate designs
- Nippers for curved edges
- Ruler or measuring tape for precise measurements
- Chalk line for marking straight cuts
Utilizing these tools not only simplifies the installation process but also guarantees that each tile fits perfectly, resulting in a polished appearance in any tile project.
Measuring Techniques Explained
Accurate measuring is fundamental to the success of any tile installation project, especially when using tools like tile cutters and wet saws.
Employing effective tile measurement techniques is essential for guaranteeing precise cuts and minimizing waste. Start by measuring the area to be tiled, taking into account the dimensions of each tile and the grout lines.
Accurate layout planning involves marking reference lines on the subfloor to guide tile placement. This preparation helps avoid misalignment and errors during installation.
Employing these strategies assures that tiles fit seamlessly, enhancing the overall appearance and durability of the tiled surface.
Practice Makes Perfect
Mastering the art of tile cutting is essential for achieving a professional finish in any tiling project.
Accurate cutting enhances the complete aesthetic and functionality of tile installation. Skill development in this area can be improved through consistent practice.
- Utilize a quality tile cutter for precision.
- Measure twice before cutting to avoid mistakes.
- Practice on scrap tiles to build confidence.
- Apply consistent pressure while cutting for even edges.
- Familiarize with different tile materials and their cutting techniques.
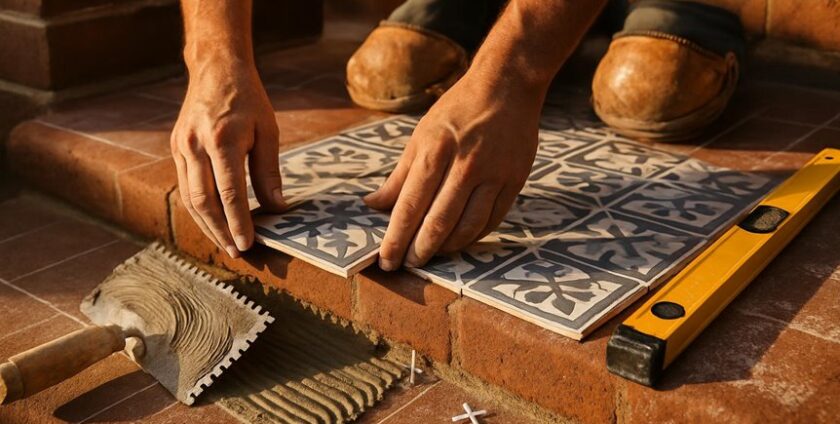
Installing Tiles: Step-by-Step Guide
Installing tiles requires careful planning and methodical execution to achieve a professional finish.
First, select a tile design that aligns with current trends and consider eco-friendly options to minimize environmental impact.
Next, prepare the surface by guaranteeing it is clean, dry, and level.
Then, measure and mark guidelines for proper alignment.
Apply thin-set mortar evenly and start placing tiles, pressing them firmly into the adhesive.
Continue until the area is covered, using spacers to maintain consistent gaps.
Finally, allow the installation to set before grouting.
This systematic approach guarantees a visually appealing and durable tile installation.
Ensuring Proper Spacing and Alignment
While achieving a professional tile installation relies heavily on proper spacing and alignment, many DIY enthusiasts underestimate its importance.
Effective tile spacing techniques and alignment tips are essential for a visually appealing and durable finish.
- Use spacers for consistent gaps.
- Measure and mark reference lines before starting.
- Check alignment frequently with a level.
- Work from the center of the room outward.
- Adjust tiles as needed during installation.
Grouting Techniques for a Flawless Finish
Achieving a flawless finish in tile installation hinges greatly on effective grouting techniques.
First, selecting the right grout color is essential, as it influences the overall aesthetic of the tiled surface. Light colors can create a seamless look, while darker shades can add depth.
Next, ensuring proper grout consistency is critical; it should be neither too thick nor too runny. A well-mixed grout can fill gaps adequately without sagging or shrinking.
When applying grout, use a float to press it into the joints, ensuring a smooth and even application.
Mastering these techniques will greatly enhance the final appearance of the tile installation.
Sealing and Maintaining Your Tiles
Once the grouting process is complete, the next essential step in tile installation involves sealing and maintaining the tiles. Proper sealing guarantees longevity and resilience against stains and moisture.
Homeowners should consider effective tile sealing techniques and follow these tile maintenance tips to preserve their investment:
- Use a high-quality sealant appropriate for the tile type.
- Clean tiles regularly with pH-neutral cleaners to avoid damage.
- Reseal tiles periodically, typically every 1-3 years.
- Avoid harsh chemicals that can degrade the sealant.
- Address spills immediately to prevent staining.
Common Mistakes to Avoid
When installing tiles, several common mistakes can undermine the final result.
Proper surface preparation is essential, as neglecting this step can lead to uneven surfaces and adhesive failures.
Additionally, overlooking grout lines and skipping necessary expansion joints can cause long-term damage and compromise the complete integrity of the installation.
Improper Surface Preparation
Although many homeowners may overlook the importance of proper surface preparation, it is an essential step that can greatly impact the longevity and appearance of tile installations.
Common mistakes include:
- Failing to conduct moisture assessment considerations
- Neglecting surface leveling techniques
- Ignoring existing floor imperfections
- Not cleaning the surface thoroughly
- Skipping the use of appropriate underlayment
Addressing these issues guarantees a sturdy foundation for tile work, minimizing the risk of future damage.
Ignoring Grout Lines
Proper surface preparation sets the stage for a successful tile installation, but neglecting grout lines is another common pitfall that can compromise the general quality of the project.
The grout line importance extends beyond mere functionality; it serves a vital function in the overall aesthetic considerations of the tiled surface. Uneven or inconsistent grout lines can detract from the visual appeal, creating an unprofessional look.
Additionally, proper grout application helps prevent moisture infiltration and damage to the underlying structure. As a result, attention to grout lines is essential for achieving both durability and an attractive finish in tile installations.
Skipping Expansion Joints
Neglecting to include expansion joints during tile installation can lead to significant issues over time, as these joints are essential for accommodating the natural expansion and contraction of materials.
The expansion joint importance cannot be emphasized enough, as skipping them can result in various consequences, including:
- Cracked tiles
- Uneven surfaces
- Grout failure
- Warping of flooring
- Increased repair costs
To guarantee a successful installation, professionals should always account for these joints in their planning.
Tools You’ll Need for the Job
Successful tile installation requires a specific set of tools to secure precision and efficiency throughout the process. Essential equipment includes a tile cutter, trowel, and grout float.
A level and measuring tape guarantee accurate layout and spacing, while a rubber mallet helps position tiles without damage. Additionally, a bucket for mixing adhesive and grout, along with a sponge for cleanup, are vital.
Safety gear, such as gloves and knee pads, should not be overlooked. By having the right tile installation tools on hand, installers can achieve a professional finish and maintain quality throughout the project.
Hiring a Professional vs. DIY Installation
When considering tile installation, homeowners must weigh the benefits of hiring a professional against the appeal of a DIY approach. A cost comparison often reveals that while DIY may seem cheaper, it can lead to unexpected expenses.
- Professional expertise guarantees quality results.
- DIY may extend the project timeline due to learning curves.
- Professionals often provide warranties for their work.
- DIY can be fulfilling but requires time and effort.
- Mistakes in DIY can lead to costly repairs.
Ultimately, the decision should align with the homeowner’s skills, budget, and desired outcome, guaranteeing a successful tile installation experience.
Frequently Asked Questions
How Long Does Tile Installation Typically Take?
Tile installation typically takes one to three days, depending on the installation timeline and various project factors. These factors include the size of the area, type of tile, and complexity of the design.
Can I Install Tile Over Existing Flooring?
Yes, tile can be installed over existing flooring, provided there’s proper tile compatibility and flooring preparation. Ensuring a clean, level surface will help achieve ideal adhesion and durability for the new tile installation.
What Is the Best Tile for Radiant Heating Systems?
Ceramic tiles and stone tiles are both excellent choices for radiant heating systems. Ceramic tiles provide good thermal conductivity, while stone tiles offer durability and aesthetic appeal, making them suitable for efficient heat distribution in flooring.
Are There Specific Tiles Recommended for Outdoor Use?
Specific outdoor tile types include porcelain, ceramic, and natural stone, chosen for their durability factors like frost resistance and slip resistance. These qualities guarantee longevity and safety in various weather conditions, making them suitable for outdoor applications.
How Do I Remove Old Tile Without Damaging the Subfloor?
To remove old tile without damaging the subfloor, one should use effective tile removal techniques, such as a chisel or pry bar. Additionally, applying protective measures, like plywood or cardboard, can safeguard the subfloor during the process.
Conclusion
In summary, successful tile installation in Philadelphia requires careful attention to detail, from selecting the appropriate tile and adhesive to ensuring a well-prepared subfloor. By accurately measuring and planning the layout, as well as mastering cutting and grouting techniques, homeowners can achieve a professional finish. Additionally, understanding common mistakes and knowing when to seek professional help can further enhance the installation process. With the right approach, durable and aesthetically pleasing tiles can enhance any space.
- By: Francis Burnet
- Tags: expert tips, Philadelphia PA, tile installation
- Category: Custom Floor Finishes
- 0 comment